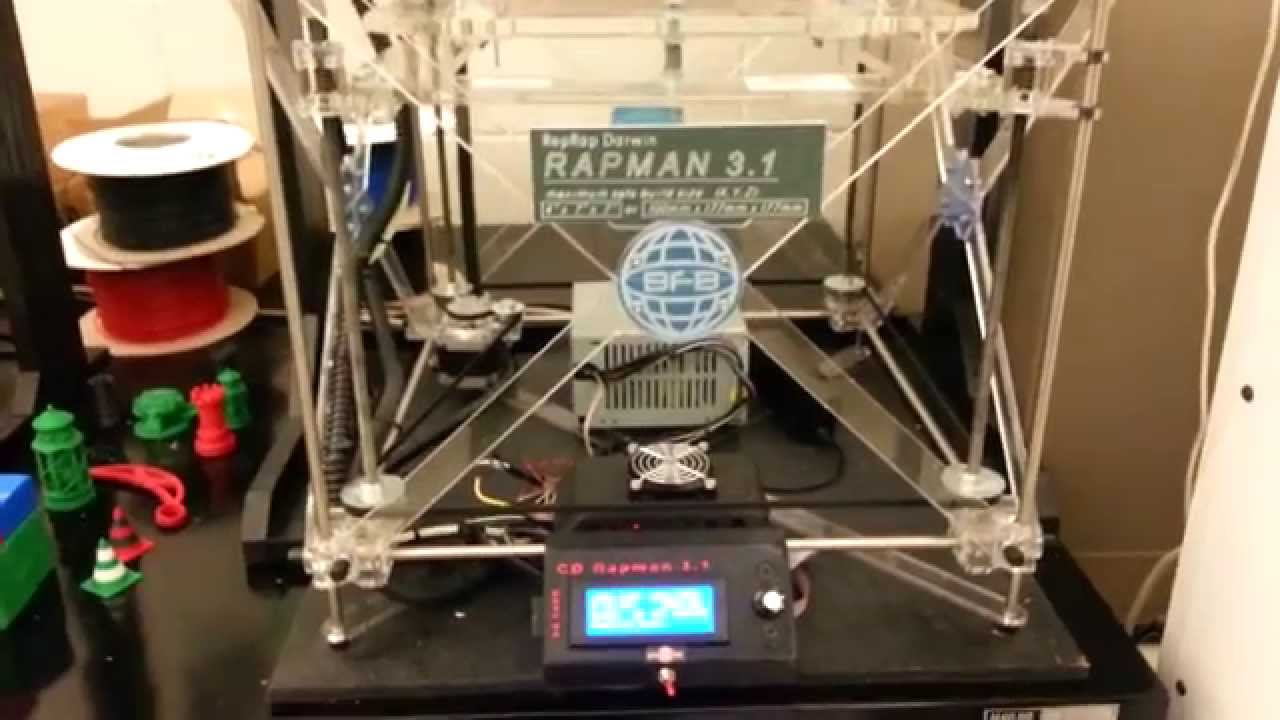
The RapMan Single occupies a unique position in 3D printing history as one of the earliest commercially available desktop 3D printer kits that brought RepRap technology from academic laboratories and maker spaces into homes, schools, and small businesses worldwide. Launched by Bits From Bytes in 2008, the RapMan Single established the design philosophy, build quality, and user experience that would define an entire generation of desktop manufacturing equipment.
This comprehensive guide explores the technical specifications, assembly process, capabilities, and historical significance of the RapMan Single. Whether you’re researching 3D printing history, maintaining vintage equipment, or understanding how modern desktop printers evolved from these pioneering machines, this article preserves essential knowledge about a printer that helped democratize digital manufacturing.
Historical Context and Development
The RepRap Foundation
The RapMan Single emerged directly from the RepRap (Replicating Rapid-prototyper) project initiated by Dr. Adrian Bowyer at the University of Bath in 2005. The RepRap philosophy centered on creating self-replicating machines capable of printing their own components, with all designs released as open-source hardware to enable global collaboration and accessibility.
Early RepRap machines like Darwin (2007) and Mendel (2009) demonstrated feasibility but required significant technical expertise to build and operate. Components were sourced from multiple suppliers, documentation was scattered across wiki pages and forum posts, and successful assembly often required direct community support. While revolutionary, these machines remained primarily tools for dedicated hobbyists and researchers.
Bits From Bytes’ Commercial Vision
Ian Adkins and the Bits From Bytes team recognized that RepRap technology could serve broader markets if packaged as complete, well-documented kits with professional support. The RapMan Single represented their solution: a commercially-produced RepRap derivative that maintained open-source principles while adding:
Complete Kit Integration: Every component from frame extrusions to the smallest fastener included in a single package, eliminating the scavenger hunt that characterized pure RepRap builds.
Professional Documentation: Comprehensive assembly manuals with clear photographs, detailed diagrams, and step-by-step instructions that enabled successful builds without prior experience.
Quality Control: Factory-tested electronics, precision-machined components, and quality hardware that ensured reliability beyond hand-assembled DIY machines.
Technical Support: Direct access to engineers who understood both the hardware and printing process, providing troubleshooting assistance that pure open-source projects couldn’t match.
Upgrade Path: Modular design allowing users to start with single extruder configuration and expand capabilities as needs evolved.
Market Impact and Reception
The RapMan Single’s introduction in 2008 represented a watershed moment for desktop 3D printing. Priced at approximately £750-850 ($1,200-1,400 USD) for the complete kit, it occupied the crucial middle ground between expensive commercial systems costing $15,000+ and pure DIY builds requiring 100+ hours of sourcing and fabrication.
Educational institutions particularly embraced the RapMan Single. Universities purchased units for engineering curricula, introducing students to additive manufacturing principles without the capital requirements of professional systems. Secondary schools used them for STEM education, demonstrating how digital design translated to physical objects. The combination of assembly experience and operational learning created comprehensive educational value.
The maker community and early adopters provided crucial feedback that shaped the RapMan platform’s evolution. User modifications, software improvements, and application discoveries shared through forums and wikis created a knowledge ecosystem that benefited all users. This community-driven development, enabled by open-source hardware principles, accelerated the printer’s capabilities beyond what BfB engineering alone could achieve.
Technical Specifications
Build Volume and Mechanical Design
The RapMan Single featured a build envelope of approximately:
X-axis (width): 300mm (11.8 inches) Y-axis (depth): 245mm (9.6 inches)
Z-axis (height): 210mm (8.3 inches)
Total Build Volume: Approximately 15.4 liters
This build volume positioned the RapMan Single in the “medium format” category for the era, significantly larger than the Makerbot Cupcake’s 100×100×100mm but smaller than industrial systems. The dimensions were carefully chosen to accommodate practical objects—replacement parts, prototype assemblies, educational models—while maintaining manageable footprint on workshop benches or classroom tables.
The mechanical framework utilized:
Frame Construction: 20mm aluminum extrusion profiles (T-slot design) providing rigid, modular structure with good vibration damping characteristics.
Linear Motion: 8mm hardened steel rods for all axes, supported by LM8UU linear bearings providing smooth, low-friction movement.
Drive System: GT2 timing belts with 20-tooth pulleys on X and Y axes; threaded rod (M5 or M8) with brass nut on Z-axis for vertical positioning.
Motors: NEMA 17 stepper motors (typically 1.8° step angle, 40-60Ncm holding torque) driving all three axes plus extruder.
Extruder and Hot End
The RapMan Single shipped with a single direct-drive extruder assembly:
Hot End Design: All-metal hot end with brass nozzle, typically 0.5mm orifice diameter (0.4mm and 0.35mm also available)
Heating: Resistive heater cartridge (12V, 40W typical) with PID temperature control
Temperature Range: Up to 260°C maximum, suitable for ABS and PLA
Thermistor: 100k NTC thermistor for temperature sensing
Drive Mechanism: Hobbed bolt gear mechanism with spring-loaded bearing creating controlled filament grip
Filament Diameter: 3mm (2.85mm actual) filament standard for the era
Feed Rate: Maximum theoretical 15-20mm/s filament throughput depending on material and temperature
The direct-drive configuration meant the stepper motor mounted directly to the moving X-carriage, adding mass but providing strong, reliable filament pushing force. This design choice prioritized reliability over speed, reflecting the era’s emphasis on successful prints over rapid throughput.
Electronics and Control
The RapMan Single utilized electronics derived from RepRap project standards:
Controller Board: RepRap Generation 3 electronics (later units used Generation 6 or Arduino Mega + RAMPS combination)
Processor: ATmega328 or ATmega644 microcontroller running custom firmware
Stepper Drivers: A4988 or DRV8825 drivers with adjustable current control
Heated Bed Control: Power MOSFET switching 12V power to heated bed element
Power Supply: 12V DC switching power supply, typically 15-20A capacity
Connectivity: USB connection to host computer running control software
Limit Switches: Mechanical microswitches on X, Y, and Z minimum positions for homing
The electronics provided basic but functional control, with all processing handled by dedicated computer software rather than onboard. This architecture reflected the era’s computing paradigm where desktop computers were always available during printing.
Heated Bed System
The heated aluminum bed proved essential for ABS printing:
Bed Material: 6mm cast aluminum tooling plate providing thermal mass and flatness
Heating Element: PCB-based resistive heater or silicone heating pad (12V, 100-150W)
Temperature Range: Up to 110°C maximum, standard 100-105°C for ABS
Temperature Sensor: 100k NTC thermistor embedded in bed or mounted to surface
Surface Finish: Smooth machined aluminum requiring tape, adhesive, or surface treatment
Leveling: Three or four adjustment points with springs allowing manual bed leveling
The heated bed transformed printing reliability, particularly for ABS materials that otherwise warped severely. Early RapMan Single units without heated beds required users to print only PLA or modify the printer, leading BfB to make heated beds standard equipment.
Assembly Process and Experience
Kit Contents and Organization
The RapMan Single arrived as a comprehensive kit containing:
Mechanical Components:
- Aluminum extrusion frame pieces (pre-cut to length)
- Linear bearing rods (8mm diameter, various lengths)
- LM8UU linear bearings
- Timing belts and pulleys
- Frame corner brackets and T-slot nuts
- Complete fastener kit (metric bolts, nuts, washers organized by size)
Motion Components:
- Four NEMA 17 stepper motors
- Motor mounting brackets
- Belt tensioning hardware
- Z-axis lead screw and brass nut
- Shaft couplers
Extruder Assembly:
- Hot end with brass nozzle
- Heater cartridge and thermistor
- Extruder motor and drive gear
- Wade’s extruder body parts (3D printed)
- Springs, bolts, idler bearing
Electronics:
- Controller board in protective case
- Stepper driver boards
- Power supply unit
- USB cable
- Limit switches with mounting hardware
- Cable harness with connectors
Heated Bed:
- Aluminum bed plate
- Heating element
- Thermistor with mounting
- Leveling springs and adjustment screws
- Kapton tape for surface preparation
Documentation:
- Printed assembly manual (50-80 pages)
- Quick reference cards
- Software CD with control programs
- Community resources and contact information
Assembly Timeline and Skill Requirements
Estimated Assembly Time: 12-20 hours for first-time builders
Skill Level Required: Moderate mechanical aptitude, comfortable with hand tools
Tools Needed (typically not included):
- Metric Allen key/hex wrench set (2mm, 2.5mm, 3mm, 4mm, 5mm)
- Adjustable wrench or metric wrench set
- Phillips and flat-head screwdrivers
- Wire strippers and cutters
- Multimeter (for testing electrical connections)
- Square for checking frame alignment
- Small level for bed leveling
The assembly process was designed for methodical completion over several sessions rather than marathon single-day builds. Key phases included:
Phase 1: Frame Construction (3-4 hours)
- Assembling aluminum extrusion frame
- Installing corner brackets and ensuring square
- Mounting base plate
- Initial structural verification
Phase 2: Linear Motion System (3-4 hours)
- Installing X, Y, Z axis rods
- Mounting linear bearings to carriages
- Installing timing belts and tensioning
- Installing Z-axis lead screw
- Testing smooth motion on all axes
Phase 3: Electronics Installation (2-3 hours)
- Mounting controller board
- Installing stepper drivers
- Routing and connecting motor cables
- Installing limit switches
- Connecting power supply
- Initial electronics testing
Phase 4: Extruder Assembly (2-3 hours)
- Building Wade’s extruder mechanical components
- Installing hot end
- Mounting extruder motor
- Routing thermistor and heater wires
- Testing heating and temperature sensing
Phase 5: Heated Bed (1-2 hours)
- Mounting bed to Z-carriage
- Installing heating element
- Attaching thermistor
- Wiring bed heater to controller
- Initial leveling
Phase 6: Calibration and Testing (2-3 hours)
- Mechanical calibration
- Endstop positioning
- Temperature PID tuning
- First extrusion tests
- Print bed leveling
- Test prints
Common Assembly Challenges
Belt Tensioning: Finding optimal tension that prevented skipping without creating excessive motor load required experience. Too loose caused positional errors; too tight increased motor heat and wear.
Electrical Connections: Ensuring correct polarity on heaters and thermistors while managing cable routing through moving assemblies challenged many builders.
Bed Leveling: Achieving level bed across entire surface with three or four-point adjustment required patience and systematic approach.
First Extrusion: Getting initial filament flow often involved temperature adjustments, ensuring proper nozzle assembly, and confirming extruder drive tension.
Despite these challenges, the RapMan Single’s documentation and community support enabled high success rates. Many users reported successful first prints within 24-48 hours of starting assembly.
Software and Workflow
Slicing Software – Skeinforge
The RapMan Single era predated modern integrated slicing environments, relying instead on multi-step workflows:
Skeinforge served as the primary slicing engine, converting 3D models (STL files) into G-code instructions. The software featured:
Craft: Collection of plugins controlling every aspect of slicing Profiles: Pre-configured settings for different materials and quality levels
Carve: Converting model geometry into horizontal slices Fill: Generating infill patterns and density Speed: Controlling feed rates for different print operations Temperature: Managing hot end and bed temperatures Dimension: Compensating for material shrinkage and expansion
Skeinforge’s complexity intimidated new users but provided expert control unavailable in simpler tools. The BfB community developed optimized profiles that new users could import, reducing the learning curve significantly.
Host Software – ReplicatorG
ReplicatorG provided the interface between computer and printer:
Functions:
- Loading and visualizing G-code files
- Managing USB connection to printer
- Monitoring temperatures in real-time
- Manual jog controls for testing
- Emergency stop capability
- Basic G-code editor
The software required dedicated computer connection throughout printing, as the printer had no onboard storage. This limitation meant print failures if computers crashed or USB connections were interrupted, though it also enabled real-time monitoring and intervention.
Typical Print Workflow
Step 1: Model Preparation
- Create or obtain 3D model (STL format)
- Check model for errors (manifold geometry, correct scale)
- Orient model for optimal printing
- Add support structures if needed
Step 2: Slicing with Skeinforge
- Load STL file into Skeinforge
- Select appropriate profile (material, quality)
- Adjust settings as needed
- Generate G-code file
- Review estimated time and material usage
Step 3: Print Preparation
- Load G-code into ReplicatorG
- Connect to RapMan Single via USB
- Home all axes using software controls
- Preheat hot end and bed to target temperatures
- Load filament and prime nozzle
- Perform final bed level check
Step 4: Printing
- Start print from ReplicatorG
- Monitor first layer closely (most critical)
- Periodically check print progress
- Maintain computer connection throughout
Step 5: Completion
- Allow bed to cool before part removal
- Remove print carefully to avoid bed damage
- Clean up any support material
- Post-process as needed
This multi-step process, while more involved than modern integrated workflows, provided deep understanding of 3D printing mechanics that educated an entire generation of makers.
Printing Capabilities and Material Compatibility
Material Options
The RapMan Single primarily printed two thermoplastic materials:
ABS (Acrylonitrile Butadiene Styrene):
- Most common material for RapMan Single
- Required heated bed (100-110°C)
- Excellent mechanical properties
- Good for functional parts
- Acetone smoothing possible
- Requires ventilation due to styrene fumes
PLA (Polylactic Acid):
- Alternative for heated bed-less printing
- Lower temperature requirements
- Less warping tendency
- More brittle than ABS
- Better for aesthetic prints
- Biodegradable and lower odor
Some advanced users experimented with:
- HDPE (High-Density Polyethylene)
- Nylon variants
- Flexible filaments (with modifications)
- Wood and metal-filled composites (as they became available)
Print Quality Characteristics
Layer Resolution:
- Typical: 0.2-0.35mm layer heights
- Fine detail: 0.1-0.15mm possible with patience
- Fast draft: 0.4mm maximum practical
Surface Finish:
- Visible layer lines characteristic of FDM
- Horizontal features smoother than vertical
- Stair-stepping on angles less than 45°
- Support removal marks requiring post-processing
Dimensional Accuracy:
- ±0.3-0.5mm typical for well-calibrated machine
- Material shrinkage requiring compensation (ABS ~0.8%)
- Better accuracy on X/Y than Z axis
- Temperature stability critical for consistency
Build Speed:
- 30-50mm/s typical print speeds
- 20-100mm³/s volumetric flow rate
- 3-12 hours for typical objects
- Overnight prints common for complex models
Design Considerations for RapMan Single
Overhangs: Angles greater than 45° required support structures, adding material usage and post-processing time.
Bridging: Unsupported horizontal spans up to 5-10mm possible with proper cooling; longer spans needed support.
Wall Thickness: Minimum 1.5-2mm for structural integrity; 0.8mm possible for non-structural elements.
Detail Resolution: Features smaller than 0.4-0.5mm (nozzle diameter) often didn’t reproduce reliably.
Part Orientation: Optimizing orientation balanced surface quality, strength (layer orientation), support requirements, and print time.
Applications and Use Cases
Educational Institutions
The RapMan Single found extensive adoption in educational settings:
University Engineering Programs:
- Product design courses used RapMan for rapid prototyping
- Mechanical engineering students printed test specimens
- Manufacturing curricula included additive manufacturing principles
- Research labs prototyped experimental equipment
Secondary Education:
- STEM programs demonstrated digital manufacturing
- Design and technology courses produced student projects
- Robotics teams fabricated custom components
- Art programs explored three-dimensional creation
Workshops and Training:
- Community makerspaces offered 3D printing access
- Technical colleges taught manufacturing technology
- Professional development programs introduced digital tools
The combination of assembly experience and printing operation provided comprehensive learning value that turn-key solutions couldn’t match.
Professional Prototyping
Small businesses and consultancies deployed RapMan Singles for product development:
Design Iteration:
- Testing ergonomic variations quickly
- Evaluating aesthetic concepts physically
- Fitting checks before expensive tooling
- Client presentation models
Low-Volume Production:
- Custom fixtures and jigs
- Replacement parts for discontinued products
- Specialized tools and accessories
- Limited-run consumer products
Cost Advantages:
- Fraction of service bureau costs
- On-demand production without inventory
- Design changes implemented immediately
- No minimum order quantities
Hobby and Personal Projects
Enthusiasts found endless applications:
Customization:
- Personalized phone cases and accessories
- Custom organizers and storage solutions
- Hobby and gaming miniatures
- Artistic sculptures and decorations
Repairs:
- Replacement parts for appliances
- Vintage equipment components
- Automotive interior pieces
- Toy and gadget repairs
Innovation:
- Original inventions and devices
- Robotics and automation projects
- Home improvement solutions
- Gift creation
RepRap Self-Replication
The RapMan Single participated in the RepRap philosophy by printing components for additional printers:
Printable Components:
- Extruder body parts (Wade’s extruder design)
- Motor mounts and brackets
- Belt tensioners
- Wire management clips
- Endstop triggers
- Various structural connectors
Users could print approximately 40-60% of the components needed to build another RepRap-derived printer, then source the remaining metal rods, electronics, and fasteners. This capability embodied the self-replicating vision that inspired the RepRap project.
Maintenance and Reliability
Routine Maintenance Requirements
Weekly Tasks (active use):
- Clean build surface (remove adhesive residue)
- Check belt tension
- Verify bed leveling
- Inspect filament path for dust/debris
- Confirm limit switches function
Monthly Tasks:
- Lubricate linear bearings (light machine oil)
- Tighten frame fasteners (thermal cycling loosened connections)
- Clean extruder drive gear
- Verify motor connections secure
- Check heated bed electrical connections
Periodic Maintenance:
- Replace worn belts (6-12 months depending on use)
- Replace nozzle if damaged or clogged (as needed)
- Inspect linear rods for wear (yearly)
- Update firmware and software
- Recalibrate printer after maintenance
Common Issues and Solutions
Warping Prints:
- Ensure bed temperature reaches 100-110°C for ABS
- Apply proper adhesion surface (Kapton, ABS slurry)
- Eliminate drafts through enclosure
- Use brim or raft for large flat prints
- Reduce part cooling
Poor Layer Adhesion:
- Increase hot end temperature 5-10°C
- Slow print speed to allow bonding time
- Verify filament diameter consistency
- Check for partial nozzle clogs
- Ensure adequate extrusion multiplier
Stringing and Oozing:
- Enable retraction in slicer (4-6mm typical)
- Reduce hot end temperature slightly
- Increase retraction speed
- Minimize non-printing travel moves
- Clean nozzle exterior
Dimensional Inaccuracy:
- Calibrate stepper motor steps/mm
- Compensate for material shrinkage in slicer
- Verify belt tension (eliminate backlash)
- Check for mechanical binding or resistance
- Maintain consistent temperatures
Electronics Issues:
- Check stepper driver current settings
- Verify all connections secure
- Test power supply voltage
- Replace failed thermistors or heaters
- Update firmware if buggy
Upgrade Paths
The RapMan Single’s modular design enabled numerous improvements:
E3D Hot End: Replacing original hot end with modern E3D V5 or V6 improved reliability and temperature range.
Dual Extrusion: Adding second extruder enabled multi-material or support material printing.
Bowden Extruder: Converting to Bowden configuration reduced moving mass for faster printing.
32-bit Electronics: Upgrading to modern controller boards (Duet, SKR) added features and reliability.
Automatic Bed Leveling: Adding sensors enabled mesh bed compensation.
Direct Power Supply: Replacing 12V with 24V system improved heating times.
Community and Resources
Online Communities
The RapMan Single benefited from active user communities:
Bits From Bytes Forum: Official support forum with direct manufacturer participation, troubleshooting, and shared modifications.
RepRap.org Wiki and Forums: Broader RepRap community provided design inspiration, software tools, and technical knowledge.
Thingiverse and Early Repositories: Users shared 3D models optimized for RapMan capabilities.
YouTube Tutorials: Early adopters documented assembly, calibration, and printing techniques.
Knowledge Sharing
The open-source foundation encouraged documentation and sharing:
Modifications: Users published mechanical improvements, electronics upgrades, and software optimizations.
Profiles: Optimized slicing profiles for different materials and applications circulated freely.
Troubleshooting Guides: Experienced users created diagnostic flowcharts and solution databases.
Project Galleries: Completed prints inspired others and demonstrated capabilities.
This collaborative ecosystem accelerated individual success and collective advancement beyond proprietary platforms.
Historical Significance and Legacy
Impact on Desktop 3D Printing
The RapMan Single’s importance extends beyond its technical specifications:
Accessibility: Bringing RepRap technology to users without fabrication capabilities or deep technical expertise opened 3D printing to broader audiences.
Education: Introducing thousands of students and educators to additive manufacturing created workforce with practical digital fabrication experience.
Business Model: Demonstrating viability of open-source hardware companies encouraged others to commercialize community-developed technology.
Design Philosophy: Balancing kit assembly experience with reliable operation influenced numerous subsequent printer designs.
Price Point: Establishing ~$1,000-1,500 as attainable for serious hobbyists and educational institutions created market expectations that drove broader adoption.
Evolution to Later Models
The RapMan Single’s success led to expanded product line:
RapMan 3.0 (2009): Added dual extrusion and refined mechanics while maintaining core design.
RapMan 3.1 (2010): Improved electronics, better hot end, enhanced reliability based on community feedback.
RapMan 3.2 (2011): Final refinement before Bits From Bytes acquisition and focus shift.
3DTouch (2010): Consumer-focused fully-assembled printer targeting less technical users.
Each iteration built on lessons learned from RapMan Single deployment while maintaining the fundamental architecture that proved successful.
End of Production
Bits From Bytes’ 2010 acquisition by 3D Systems and subsequent product line changes ended RapMan production by 2012-2013. However, the machines’ impact continued through:
Installed Base: Hundreds or thousands of RapMan Singles remained in use, with parts and knowledge still available.
Design Influence: Core concepts appeared in subsequent printers from other manufacturers.
Educational Pipeline: Engineers and makers who learned on RapMan Singles advanced the entire field.
Open Source Legacy: Designs and knowledge contributed to RepRap project benefited all future development.
Modern Perspective and Restoration
Historical Value
RapMan Singles represent important artifacts in 3D printing history:
Museum Collections: Technology museums and educational institutions preserve working units as demonstration pieces.
Historical Research: Understanding early desktop 3D printing evolution requires examining these pioneering machines.
Comparative Context: Modern printers’ capabilities are best appreciated against their historical predecessors.
Nostalgia: Early adopters maintain emotional attachment to machines that introduced them to digital fabrication.
Restoration and Maintenance
Keeping vintage RapMan Singles operational involves:
Parts Availability: While original BfB parts are scarce, RepRap standardization means substitutes exist for most components.
Modern Upgrades: Contemporary hot ends, electronics, and sensors can enhance reliability while maintaining character.
Documentation Preservation: Scanning and archiving original manuals ensures knowledge persists.
Community Knowledge: Former users and repair specialists maintain expertise through online communities.
Comparing to Modern Printers
Contemporary entry-level printers have vastly improved:
Advantages of Modern Machines:
- Automatic bed leveling
- 32-bit electronics with advanced features
- Better hot ends and more reliable extrusion
- Integrated touchscreens and onboard storage
- Faster print speeds (100+ mm/s)
- Better print quality and reliability
- Lower prices ($200-400 for equivalent capability)
RapMan Single Enduring Advantages:
- Educational value of assembly process
- Understanding of 3D printing fundamentals
- Larger build volume than many budget modern printers
- Sturdy aluminum frame vs. cheaper alternatives
- Modification-friendly open design
- Historical significance and uniqueness
For users seeking to learn 3D printing deeply rather than just produce prints, the RapMan Single’s assembly and operation requirements provide value that turn-key solutions can’t match.
Technical Specifications Summary
Physical Dimensions
| Specification | Value |
|---|---|
| Build Volume | 300mm (W) × 245mm (D) × 210mm (H) |
| Machine Footprint | ~500mm × 450mm × 450mm |
| Weight | 12-15 kg (assembled) |
| Frame Material | 20mm aluminum extrusion |
Motion System
| Component | Specification |
|---|---|
| X/Y Axes | GT2 timing belt, 8mm linear rods |
| Z Axis | M5/M8 threaded rod, 8mm linear rods |
| Linear Bearings | LM8UU (8mm ID) |
| Motors | NEMA 17 stepper (1.8° step) |
| Max Speed | 100+ mm/s theoretical, 50mm/s practical |
Extrusion System
| Parameter | Value |
|---|---|
| Hot End Type | All-metal, brass nozzle |
| Nozzle Diameter | 0.5mm (standard), 0.35-0.8mm available |
| Max Temperature | 260°C |
| Filament Diameter | 3mm (2.85mm actual) |
| Drive Type | Direct drive, hobbed bolt |
Heated Bed
| Specification | Value |
|---|---|
| Material | 6mm aluminum plate |
| Max Temperature | 110°C |
| Power | 100-150W (12V) |
| Leveling | 3-4 point manual adjustment |
Electronics
| Component | Details |
|---|---|
| Controller | Gen3/Gen6 RepRap or Arduino Mega + RAMPS |
| Stepper Drivers | A4988 or DRV8825 |
| Power Supply | 12V DC, 15-20A |
| Connectivity | USB to host computer |
| Firmware | RepRap firmware or Marlin |
Frequently Asked Questions
Can I still buy a RapMan Single new?
No, Bits From Bytes discontinued RapMan production around 2012-2013 following their acquisition by 3D Systems. However, used units occasionally appear on auction sites, maker forums, and equipment resale markets. Prices vary widely based on condition, included accessories, and seller knowledge, typically $200-600 for complete, functional systems. Before purchasing used equipment, verify mechanical condition, electronics functionality, and parts availability for likely maintenance needs.
What modern filament works with the RapMan Single?
The RapMan Single used 3mm (2.85mm actual diameter) filament, which remains available though less common than 1.75mm. Most major filament manufacturers offer 2.85mm options in ABS, PLA, PETG, and specialty materials. Brands like Verbatim, Ultimaker, and ColorFabb provide quality 2.85mm filament. Ensure consistent diameter tolerance (±0.05mm) for reliable feeding. The printer handles standard thermoplastics well but struggles with flexible materials unless extruder is modified.
How does the RapMan Single compare to modern budget printers?
Modern $200-400 printers like Ender 3 or Prusa Mini offer better print quality, faster speeds, automatic bed leveling, and integrated controls. However, RapMan Single provides larger build volume (300×245×210mm vs. typical 220×220×250mm), educational assembly experience, sturdier aluminum frame, and historical significance. For pure printing capability, modern machines excel. For learning 3D printing mechanics deeply and understanding the technology’s evolution, RapMan Single offers unique value despite inferior specifications.
What maintenance does a RapMan Single require?
Regular maintenance includes: weekly bed surface cleaning and leveling checks; monthly lubrication of linear bearings with light machine oil; tightening frame fasteners loosened by thermal cycling; cleaning extruder drive gear; and verifying electrical connections. Belt replacement occurs every 6-12 months depending on use intensity. Nozzle replacement occurs as needed when clogged or damaged. Annual inspection of linear rods for wear and firmware updates maintain long-term reliability. Well-maintained units can operate for years.
Can I upgrade RapMan Single with modern components?
Yes, modular design enables numerous upgrades: E3D hot ends improve reliability and temperature range; 32-bit controllers (Duet, SKR) add features; automatic bed leveling sensors enable mesh compensation; all-metal hot ends allow higher-temperature materials; Bowden conversion reduces moving mass; and modern stepper drivers reduce noise. Many users maintain vintage appearance while upgrading functional components. Online communities document upgrade procedures and compatibility. Balance upgrades with preserving historical authenticity if that matters.
What software runs on modern computers?
Original ReplicatorG and Skeinforge still function but feel dated. Modern alternatives include: Ultimaker Cura (free, excellent RapMan profiles available); PrusaSlicer (RepRap-friendly, advanced features); Simplify3D (commercial, professional features); and OctoPrint (Raspberry Pi-based wireless control). For firmware, modern Marlin supports RapMan hardware with enhanced features. The transition to modern software requires configuring machine parameters but dramatically improves user experience while maintaining hardware capabilities.
Is the RapMan Single safe for home use?
With proper precautions, yes. Key safety considerations: adequate ventilation for ABS fumes (window fan or dedicated exhaust); supervised operation (don’t leave unattended); heat safety (hot end reaches 240°C, bed 110°C); electrical safety (quality power supply, proper grounding); fire extinguisher accessibility; and stable placement preventing tip-over. Heated components present burn risks, and ABS fumes require ventilation. Modern printers have more safety features (thermal runaway protection, enclosed hot ends), so additional caution is warranted. Never operate in sleeping areas.
What is the RapMan Single worth today?
Value depends on condition, completeness, and buyer. Fully functional units with documentation, tools, and spare parts: $300-600. Working units needing minor repair or calibration: $200-400. Non-functional units for parts or restoration: $100-200. Historical significance adds value for collectors and museums. Sentimental value for early adopters often exceeds market value. Before selling, consider community members seeking vintage equipment or educational institutions building technology history collections. Some users consider them too historically significant to part with regardless of monetary value.
Related Historical Documentation
Explore more about the RapMan family and Bits From Bytes legacy:
RapMan Series:
- RapMan 3.1 3D Printer – Evolution with dual extrusion
- RapMan 3.2 Kit – Final refinement
- 3DTouch printer – Consumer-focused alternative
- RapMan Single Assembly Guide
Materials and Software:
- 3D Printing Materials Catalog – Compatible filaments
- Skeinforge Guide – Slicing software documentation
- G-Code Reference – Understanding print commands
Educational Resources:
- Teaching Resources – Educational applications
- Complete BfB Wiki Archive – Full historical documentation
Community:
- RepRap.org forums – Ongoing community support
- Vintage 3D printer communities
- Historical technology preservation groups
For questions about RapMan Single restoration, parts sourcing, or historical research, visit our main documentation hub.
This article preserves historical knowledge about the Bits From Bytes RapMan Single (2008-2013) based on period documentation, user experiences, and technical specifications. While we strive for accuracy, details may vary between production runs and user modifications. Modern safety standards should be applied when operating vintage equipment. This documentation serves educational and historical preservation purposes.
Last updated: November 2025